Sunday, December 12, 2010

Toga! Toga! Toga!

The Toga Crew
It's been a while since my last post... crazy time of year for everyone, especially in retail - you think I would be used to it after all these years but no, it still gets me every time.


Speaking of crazy times, I had my 37th birthday a few weeks back. The plan evolved from a quiet get together with family into an all out Toga party with lots of friends. After a few beers I decided to set up an impromptu photo booth in my back yard just for a bit of fun using some studio lighting - I figured with everyone having put in such a good effort with their outfits it was only fitting that we should make some good images. We all had great fun and it kicked the party along really well, as well as letting me get my photography fix for the evening...

The setup consisted of 2 back/rim lights plus one main light through a large softbox up front. The backdrop was just some small trees that looked sort of 'Romanish'. I'm sure my neighbours must have been wondering what the hell was going on with three studio strobes firing off in the back yard throughout the night, along with all the usual mayhem that comes with a great party.

Thank you to all my friends for a great night and for putting up with my photographic antics. Here are a few samples...


Yours Truly & my wife Emma

Wednesday, October 27, 2010

A Renewed Passion

A couple of weeks ago I photographed a wedding. "So what" I'm sure some will say, but this wedding was very important to not only the bride & groom but also to me as a turning point in my photography.

I'm no stranger to wedding photography. In years gone by I have photographed well over a hundred of them - all on film. Mainly due to the limited free time I have had over the last five years after becoming an owner of a retail business, the Hub Photo Shop, my professional photography has taken a bit of a back seat. In that time, other than being a guest at a few, the last wedding I photographed was for some friends of mine a couple of years ago, and my first on digital - and I loved it. I was pretty happy with the results, as where they, and that little feeling, that little itch, started to come back - the one where you just want to keep on making pictures; officially you're doing a job but underneath that official veneer you are just loving making great images & having fun.

Well, that feeling was back again with a vengeance two weeks ago, and I am so glad I said yes to shooting this wedding. I have turned down many over the last five years - initially due to just not having the time, but then through lack of confidence & not wanting to do a bad job - having been out of the game for a while and all. I know Rhonda through the Hub Vet Clinic where I took both my Shepherds when I had them - she had asked me a couple of times throughout the year if I would photograph her wedding, and I had declined her on each occasion, but she wouldn't give up & something told me that I should say yes to her. Thank you Rhonda, and Torey, for letting me share your special day, and for reigniting my photographic passion in regards to weddings.

They couldn't have asked for a better day, especially considering the crazy weather we have been having recently. Everything was outdoors, within the grounds of Old Government House in the Belair National Park - a beautiful place surrounded by natural bushland and an almost endless supply of photographic opportunities. I had an awesome day, as did the happy couple, and I am really pleased with the images - winners all round.

Over the last five years, despite my lack of actual professional work, I think I have done the most reading, watching, researching & learning I have done ever - I think the inability to go out and shoot for real was replaced to a degree with an almost unsatisfiable thirst for new knowledge. So in a way this wedding was also a means for me to put a lot of that newly acquired 'text book knowledge' to practice in the real world. The contrast between the last 'payed' wedding I shot years ago and this one was huge in regards to the techniques & equipment I used - nothing amazingly startling, and common practice for many - but highly enjoyable and satisfying for me.

Thank you again Rhonda & Torey.

Some of my favourites from the day...


Monday, October 18, 2010

Indi

This posting is not an easy one to write.

A few days ago I read a blog post of Joe McNally's that really hit a spot in my emotional psyche. Joe is one of the photographers / people I look up to and have followed for a while - and who writes as well as he photographs. About 4 months ago I lost Indi my German Shepherd due to an extremely aggressive case of meningitis. She went from being normal, happy & full of life, to being placed in an induced coma within 24 hours. She was only three and a half years old. Outside of my wife, she was my best friend - she seemed to understand me on a much deeper level than most people did. I could always count on her to provide me with inspiration when working on something at home or away, whether that be photography or paperwork...  whatever. She would often watch over me in a sense, sleeping on the couch in the study where I am often working late at night. I still expect to see her now when I look over my shoulder...


I still don't understand why this happened the way it did. There were no warning signs. She was young, fit & healthy. She was one of the nicest natured animals you are ever likely to have met, in fact she often gave people a completely different view of German Shepherds after they met her. Life just sucks sometimes.

Looking to the positive side, I am very privileged to have known her for those three and a half years (had her since eight weeks old). She taught me a lot - without the need for one single spoken word. She is still teaching me. I thankfully have hundreds, maybe thousands even, of pictures of her. I have one hundred times that in precious memories, which have now become priceless. At my shop, she has become the face of 'Hub Photo Shop' to many as I have more framed pictures of her up than anything else. I have never sold one picture of her, and don't intend to, they are there purely to make the frames look good (and to keep me company if I am being honest). Since she has been gone, it has been hard answering questions about her pictures in the shop to people that don't know the story but in a strange way it has been good therapy too. I'm sure there would be many more questions if I were to suddenly remove all those pictures. Not many people know that she, and my previous Shepherd Elle, are the reason behind the 'running dog' graphic in my logo - they are a part of me, and I wanted to make that a permanent part of my photography in some way.

1st birthday

I have written this as part of a healing process I guess.

It hasn't been easy, and has brought back tears that I thought I was past. It has also made me recall plenty of happy moments too, which I am eternally grateful for. She will always be alive in my heart & my mind, as will the wisdom she left for me, and the inspiration she provided me.

Thank you my friend, and may you rest in peace. One day we will walk together again I am sure.

young Indi & me


a favourite spot

Thursday, October 14, 2010

Food for thought

The other day I got asked a favour by the owner of the cafe in the shopping centre where I operate my photographic store. He just wanted some basic shots of some new dishes they were going to put on the menu, so they could put them on display in their window to entice customers in. No problem. I have never really photographed food, and don't consider myself a food photographer, but hey - I don't generally pass up a challenge or an opportunity to make some nice images. I thought I would have a little warning and some time to prepare the shooting environment etc. Instead, a couple days later, with me on my own in the shop (my business partner on holidays), a freshly made breakfast dish arrives in store with a request to "do your best please". Okey dokey. I sent the waitress back to the cafe to bring back one of their tables along with some salt & pepper shakers and other items you would typically find on a cafe table.


There were three separate dishes to photograph. I arranged them as close as I could to receive the light from our main light we use for passport & ID images (small flash firing into a silver umbrella), and then hand held a difussed SB-900 I had in my bag (luckily) off to the side to add some light fill. Bearing in mind this is all set up in an area about 1metre x 2 metres as there is nowhere else to set up, there are customers coming in whilst this is taking place (retail store), and this food looks & smells really good and I'm starving. All were shot within a bout a ten minute window. Everything went surprisingly well considering. Customers who came in whilst this was taking place, and hadn't had lunch, I suspect may have been lured to the cafe upon leaving by the lingering aromas in the shop. As another surprise too, I got to keep and eat the last dish - pancakes with ice cream & berries - yum.

I still wouldn't consider myself a food photographer but I'm happy with the results, especially under the circumstances - as is the cafe owner. I'm now slotted in to do some more work for him - with a bit more lead time next time around.


the prints on display in cafe window

Friday, October 8, 2010

DIY Time

I'd forgotten how much I love the DIY side of photography, and these days it can be too easy to avoid going down that path when we are surrounded by technology & computers doing everything for you at the touch of a button, the click of a mouse. I needed to get some new sync cables to connect some wireless receivers to my flashes & I needed to get them sorted for the weekend...  was planning on buying some tomorrow & then gave myself a slap to the back of the head Gibbs style. I've already got all the bits I need in a box of 'not sure what I'll ever want this for but you just never know'. Thirty minutes later with the help of a pair of wire cutters, soldering iron and some heat shrink we're good to go!

I don't think a photographers bag is complete until there are some home made bits and pieces in it, held together with gaffers tape or whatever else was on hand at the time.

Wednesday, September 15, 2010

No Plan

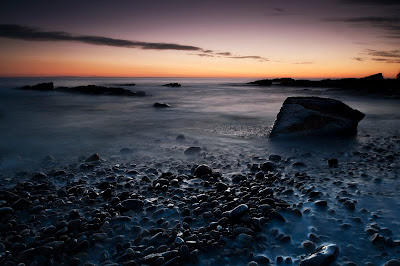
Just felt like shooting...  spent an hour or so down at Hallett Cove at the end of the day last Sunday doing some long exposures with the setting sun & the tide. I wasn't really sure what I wanted to achieve but I was happy with the results. All where taken with a straight 24mm lens (D3 / full frame sensor), and a combination of neutral density & graduated neutral density filters - exposures times between 20 & 30 seconds. I would love to get some people into these shots with some creative off camera lighting at some point... next time.


Sunday, September 5, 2010

Plan B


Mindil Beach, Darwin

About a month ago I returned from a four week, 10,000km four wheel driving & camping trip away with some great mates - the trip was aptly named "Plan B" because it was literally that. Originally we had intended to go to Cape York but changed due to time constraints and lots of water potentially adding to the detours we might need to take...   what we didn't realise was how apt that name was to be.

the Plan B crew at El Questro
It seemed almost every where we went we faced detours due to flooding, walks closed because of new time limits, towns booked out because of shows etc etc etc. We probably saw and drove through more water, and took more detours than we would have it we had stuck to the original plan truth be told but that just added to the adventure. 2000km of detours, lots of crazy weather and more mud than we knew what to do with... it wasn't exactly what we expected but it definitely was 'plan B'.

In a nut shell we went from Adelaide, South Australia through to Alice Springs via a lot of far north outback South Australia, which was very wet & muddy, then out to the Kimberly region of Western Australia (not via the Tanami Desert which was flooded), then back across to Darwin, back down through the Centre, and home via lots more mud & the Flinders Ranges. I wont go into details as you can read all about that on Tiffany Downing's blog she did on the trip http://topendtrip2.blogspot.com , but here are some images...


morning on the Oodnadatta Track

 nothing beats a camp fire in the middle of nowhere
northern Bungles
chopper flight..  yee haaar!

chillin' at a waterfall in the NT
lots of this on the way home...

Inspiration from the past

I grew up reading National Geographic as my dad had an annual subscription to the magazine. I didn't always understand the stories but I was always amazed & inspired by many of the images, even at a very young age.

In recent years as I have started to rediscover my love of photography I have made many uncanny connections to things in my past. In particular photography/photographers whose images made an impact on me in one way or another. For example, I didn't necessarily take note of the photographer of a particular image but that image and the story behind it  firmly etched itself into my memory, and then I discover that a photographer whom I admire today is that same guy behind the lens of that particular image - and many others I have yet to make the connection with I'm sure. It has got me going back through lots of old magazines & books and looking at everything again with fresh eyes & fresh ideals.

One particular photographer who I would love to meet one day is Joe McNally - an American photographer who has shot for virtually all the famous magazines of substance out there including National Geographic plus a tonne of other great stuff. Below is a short video of some of the behind the scenes work of his to get an image of a light bulb being changed on the very highest point of the Empire State building for the Nat Geo story "The power of light". It is worth taking to the time to watch this *and make sure you watch till the end - amazing stuff. Bear in mind this is before digital was mainstream & Photoshopping was used to deal with 'unforeseen issues' - you had to get it all done right at point of camera. It is quite amazing to see what goes into the making of some of these brilliant images.

Joe is amongst many people I draw inspiration from, but he is a standout to me not just as a great photographer but also as a great human being - I highly recommend reading his blog (if you aren't one of the millions already).

Enjoy...

Friday, September 3, 2010

Ouch !!

There are many different opinions on whether a UV / skylight or any sort of protection filter is required on your lens, and whether one reduces the clarity & performance of your expensive piece of glass. Well that last point is a good reason to consider one at least, as it can well be the difference between replacing the filter versus replacing the lens or at the very least an expensive repair to the lens's front element. I personally haven't found there to be any degradation to my images  - all my lenses are fitted with a UV filter. I would recommend buying the best you can afford though as some of the cheap ones will definitely lower the image quality from what I have seen. I am definitely careful with my gear, and have had a pretty good run over the years but twice now a lens has been saved by that UV filter. The last incident involved my camera body with 24-70 lens attached falling from a back pack that wasn't zipped up properly onto a tiled floor (from over a metre). The lens hit first followed by a very loud noise and the distinct sound of glass smashing. This was followed by a string of naughty words from me along with a small coronary. After the smoke had cleared and I calmed down I discovered the filter had sacrificed itself and the lens had only a  minor battle scar around the end of the barrel - I have tested it thoroughly since and it hasn't missed a beat. I am most certainly counting my lucky stars but I think it is also testament to the build quality and toughness of the true pro gear - it is big and heavy for a reason, and not just to put your spine out of whack. That $50 filter saved me $2000+.

 this is the filter's outer ring after I  persuaded it to part company with my lens.

Saturday, May 22, 2010

Cool Lens Simulator

Just a quick note about a great online 'lens simulator' I just came across...  

It's produced by Nikon but it will give you a reasonable idea of what looks like what on any DSLR system really. Even for those who already have a fair idea of what angle of view & magnification different lenses produce it's still a bit of fun. It is also a good way of seeing what happens when you use a lens designed for a cropped sensor camera on a full framed sensor body and vice-versa.

http://imaging.nikon.com/products/imaging/lineup/lens/simulator/index.htm


Global


Wednesday, April 28, 2010

What you see is not what you get

One of the most common problems I see in store when dealing with a lot of photographers who print is their monitor's calibration (or lack of). Most have some reasonable knowledge when it comes to working on their images themselves but are often unaware of the need to, and importance of calibrating their displays. It doesn't matter how good your camera gear is or how much you paid for your computer gear - if you are going to spend anytime working on your images (and you care how they look or print) you need to get your display looking reasonably accurate. Most displays will look absolutely stunning out of the box -super punchy colours, everything nice and bright...  WOW! Wow does not generally equal accurate though, in fact most displays' brightness level ends up being reduced to half that of the factory settings - often even more so. Funny enough, most photographers' images from an uncalibrated display end up printing way darker than what they were expecting.

There are a number of devices on the market that will do all the calibrating for you. Most are relatively inexpensive and well worth investing in if you are serious about your images. In a nutshell the process involved is installing the software that comes with your calibrator, plug the calibrator (technical name = colorimeter) into a USB port and then dangle it in front of your display. Run the software, follow the prompts and let it do it's thing for about 15 minutes (the software generates a whole bunch of colour swatches for the device to read) and hey presto! Then you just need to recalibrate every now and again to allow for changes in your display through age and usage. Most initial changes are pretty dramatic, even on higher quality displays.
The are a number of brands and models to choose from - I've been using a 'Spyder' made by a company called Datacolor for the last few years and have been very happy. I generally recalibrate all the displays I use monthly, including my laptop. Just a note on the use of laptops for more precise work - yes you can use one but even the better ones require you to be viewing at an optimal position to see the most accurate result - if you are slouching, or if the screen is angled differently to the optimal position you can get a very different looking image. Some laptops are near impossible to use for accurate work. I tend to use mine for on location sorting and not so important stuff and do all my serious work & finishing on a dedicated desktop display.

In finishing, I have seen & tried many manual/DIY methods for calibrating displays but if you are serious about the quality of your work, and intend to sell it, you really should be making the effort to get your working display sorted. The investment will quickly be recovered in better looking images and less print wastage. Even if your images are only for web use or you provide your clients with a digital only version, you should still be providing them with a final image that left you as accurate as you could make it.

Tuesday, April 27, 2010

A good couple of days

Just finishing up a great few days off - lately getting a couple of days off in a row is like finding gold.


I spent last night catching up with some close mates over a quiet beer or two, and today finished things up with a short 250km drive through the country side and down to Lake Alexandrina. I wasn't out to get any specific shots - just thought I'd try some experimenting with a few techniques I've been reading about lately if the chance presented itself.


On the way to a spot along Lake Alendrina we came across the entrance to a property that was a little different - these are a few 5 shot HDR images - shot RAW, combined using Photomatix Pro, and then finished off in Aperture 3. The B&W version was made using NIK Silver Efex Pro.


We went for a great walk along the shore of the lake - which is beginning to refill since the governments plans to replenish the lower lakes have been put into place. I took a few shot of Emm & Indi handholding my SB900 off to one side and triggering it wirelessly. The shot of Emm only has a tungsten white balance set, and the flash is gelled CTO (orange essentially) - this gives the sky an extra eerily blue look but keeps Emm's skin tones from going too cool. Not easy hanging on to a D3 one handed in windy conditions while hanging the other arm out with the flash - I can see why the big shots have assistants.


On the way home the weather started to get more interesting - I can never resist stopping for a shot on a dirt road somewhere for these sorts of images...   another 5 shot HDR.


As a complete contrast, tomorrow after I finish up in the shop I'll be off for 'round 2' of photography at our local football club - 6 teams this time, as well as all the players photographed individually (approx 120) - all within about an hour. Hope I sucked up enough fresh country air today to last...

On a closing note, I would like to pass on my appreciation and utmost respect to our Diggers who made the ultimate sacrifice so that we could enjoy the freedom and the lives we live today. These last few days I have enjoyed off have been due to the ANZACs - thank you.